
Connecting Networks
Every network is connected the same way. The network-specific steps are on each network’s page.
| Network | Automate provider package | Connection type | Post action |
|---|---|---|---|
| Bluesky | UmbHost.Automate.Bluesky |
bluesky |
bluesky.createPost |
| Mastodon | UmbHost.Automate.Mastodon |
mastodon |
mastodon.createStatus |
| LinkedIn (company page) | UmbHost.Automate.LinkedIn |
linkedin |
linkedin.createOrganizationPost |
| X | UmbHost.Automate.X |
x |
x.createPost |
| Facebook page | UmbHost.Automate.Meta |
meta |
meta.createFacebookPost |
UmbHost.Automate.Meta |
meta |
meta.createInstagramPost |
Other networks can be added with any Automate provider: see Custom networks.
1. Install the provider package
Section titled “1. Install the provider package”Social lists a network only when its provider package is installed (its connection type is registered in Automate). See Installation.
2. Create the connection in Automate
Section titled “2. Create the connection in Automate”Follow the network’s page to get its credentials and create the connection under Automate → Connections. Credentials stay in Automate: keep secrets in configuration (Umbraco:Automate:Secrets:*) as each provider package recommends, never in Social. Run Validate on the connection before you go on.
3. Allow the connection in a workspace
Section titled “3. Allow the connection in a workspace”Social creates each channel’s automation inside an Automate workspace. It uses a workspace that you have already set up for this:
- the workspace has a service account (Automate needs one to run published automations), and
- the workspace allows the connection the channel uses.
If several workspaces qualify, Social uses the first by alias. Social never changes a workspace: it never allows a connection anywhere you haven’t.
4. Add the channel
Section titled “4. Add the channel”In Umbraco’s Settings section, under Social › Connections, choose Add a channel, then pick the network (only networks whose Automate provider is installed are listed), the Automate connection for the account (only connections of that network’s type are listed; Open Automate to create one first), a name (up to 100 characters), and the network’s channel options, if it has any:
| Network | Option | Values | Default |
|---|---|---|---|
organizationId |
The company page’s numeric id (1 to 20 digits). Required. | none | |
| Mastodon | visibility |
public, unlisted, private or direct |
public |
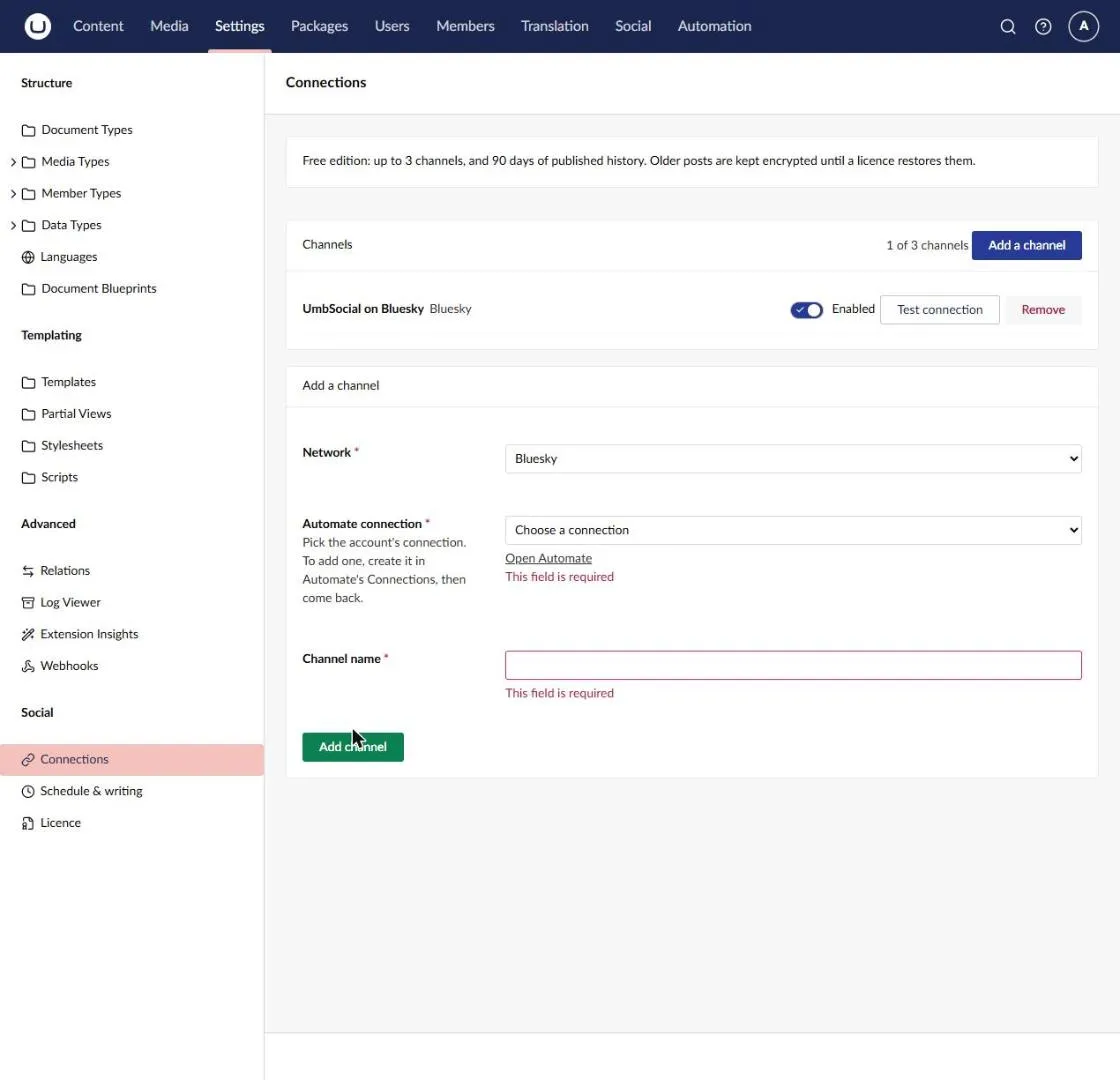
The network, the connection and the name are required: a missing one is marked on its field, as elsewhere in the backoffice, and nothing is saved. Other networks take no options. An option that isn’t listed for the network, or doesn’t match its pattern, is refused with channel.settings_invalid. Options are copied into the automation as literal values, so they can’t hold Automate bindings (${ … }) or configuration references.
Adding a channel checks that the connection exists and is the network’s connection type (channel.connection_mismatch if not). On the free edition, a fourth channel is refused (channel.limit, see Editions and licensing).
5. The managed automation
Section titled “5. The managed automation”When the channel is saved, Social creates and publishes its automation in Automate, named Publish to <channel name>. See Automate integration for what it contains.
If no workspace qualifies yet, the channel is still saved: the notice says Saved, but there’s more to do, with the warning channel.no_workspace, and the channel shows No publishing automation. Set up the workspace, then choose Create automation on the channel (or POST …/channels/{key}/automation, see Management API). It confirms with Automation created.
Changing and removing channels
Section titled “Changing and removing channels”- Changing a channel’s options updates the post step of its managed automation, and republishes it if it was published. The rest of the automation is left as you made it.
- Disabling a channel stops its posts going out. They wait until the channel is enabled again.
- Removing a channel unpublishes its automation, and fails its unsent posts on that channel with the error
channel.removed. Its history stays. A removed channel takes no new posts and no longer counts towards the channel limit. If one of its posts is being sent at that moment, removal is refused withpost.in_flight: try again shortly.